Showing posts with label trendy twine. Show all posts

Friday, October 16, 2020

Trendy Bakers Twine - Gnome Witch with Cyndy G.

Hello all! Cyndy G from Cyndy G - Time Made for Me here today to share another fun Halloween project using the Spooktacular Trendy Bakers Twine Sampler from Annie's Paper Boutique.


I love using this twine for hair and this was perfect for the Gnome Witch Box from My Scrap Chick.  I used Spooktacular Taffy Trendy Bakers Twine for her hair and it turned out so cute!

Here's what I used from Annie's Paper Boutique:

This is what I used from My Scrap Chick:
Gnome Witch Box

If you are new to Trendy Twine, you will want to check out these fun places:
Shop for Trendy Twine HERE
Follow Trendy Twine on Facebook

Friday, October 19, 2018

Trendy Baker's Twine - Boo!


Hello and welcome back, everyone! 

Guest Designer Lisa from The Relativity of Paper.


Today I'm sharing cards featuring the Happy Halloween Stamp Set and one of this month's feature products, Gray Licorice Trendy Twine


I'm sure we all find ourselves needing a quick card? I love sentiment stamps because you can create a quick background with very little effort and produce adorable cards. 

To create the cards above I stamped "BOO" along the bottom half of a 4.25" x 5.5" piece of cardstock, decided on the position of the cardstock and then cut it, the top half of the cardstock is cut down to fit the front of our card allowing for a reveal between the top and bottom pieces. Wrap Gray Licorice Trendy Twine around your card base where you plan on placing the reveal and stamp the sentiment across the trendy twine with white ink. It's transparent giving a ghostly effect. I decided to add a little interest by dry embossing cobwebs using my BigKick and scored a line between the cobwebs and BOO sentiment. Add 3D mounting foam to the back of the two pieces of cardstock and adhere to a 4.25" x 5.5" top-fold card base. I finished off the cards by including a die-cut ghost and a few clear iridescent sequins. 
For the second card, I used the same process and stamped Hello Boo-tiful alternating Distress Oxide Inks - Carved Pumpkin, Twisted Citron and Wilted Violet.


Products I used from Annie's Paper Boutique


Thanks for stopping by. 

If you are new to Trendy Twine, you will want to check out these fun places:
Shop for Trendy Twine HERE
Follow Trendy Twine on Facebook


Monday, October 15, 2018

Trendy Baker's Twine - You are Spooktacular


Hello and welcome, everyone!

Guest Designer, Lisa from The Relativity of Paper. I'm super excited to be sharing another fun sweet treat project showcasing the October's featured products, Gray Licorice Trendy Twine and Skinny Candy Chutes.  


This treat holder makes a sweet gift for teachers, kids or someone in the office. Skip the envelope with this one and place it on a desk or counter. The recipient will have a nice Halloween surprise waiting for them. 


This is such an easy project. I have a pictorial below. 

You will need a 7.75"(H) x 8.25"(W) heavy cardstock for this project. I recommend at least #80 lb, that's what I used. 
Lay the paper horizontally on scoreboard and score at the .75", 1.5" and 2.25" marks. Set aside. 
Die-cut the top of the pattern papers, align and adhere together. Trim so the pattern papers are 8.125" (W). 
Using a temporary adhesive or post- it tape center the pattern papers on the cover stock ABOVE the .75" score line. 
Flip the paper over on a paper trimmer and cut at 1.5", 2.25", 6" and 6.75" marks cutting from the .75" to the 2.25" scored lines creating straps. (See picture below) Make sure not to cut past those scored lines. 
Add a stronghold adhesive as shown in the picture above. Flip the paper over and permanently adhere the pattern papers. Be sure to never add adhesive over the cut lines, they need to be able to move freely. Flip back over and fold on the .75" score lined up, adhering it to the back of the next section. 
Score the cover at 4.25" and fold to create the card. 
You should be able to slide a skinny candy chute into the two straps on the front of the card. 

Add candy to the Skinny Candy Chute, slide it into place and secure by wrapping Gray Licorice Trendy Twine around the candy chute and tie. I stamped the You Are Spooktacular sentiment from the Annie's Paper Boutique Happy Halloween Stamp Set on the inside of the card. 
Now the fun part, decorating the front of the card. And that brings us back to this. 


Products I used from Annie's Paper Boutique


Thanks for stopping by. 

If you are new to Trendy Twine, you will want to check out these fun places:
Shop for Trendy Twine HERE
Follow Trendy Twine on Facebook


Friday, April 6, 2018

Trendy Bakers Twine - These Boots Were Made for Walkin - GDT Cyndy G

Hello crafty friends - Cyndy from Cyndy G - Time Made for Me.  I am excited to be with you for the  month of April as a Guest Designer with Trendy Twine!  


This month we are featuring Cotton Candy Trendy Twine.  

3d paper cowboy boot with a pink and blue twine fringe around the bottom half of boot

I decided to make the cowboy boot from Snapdragon Snippet because the fringe detail was a perfect place to use the Cotton Candy Trendy Twine.  To make the fringe I used double-sided tape along the top edge of the detail piece and looped the twine up and down across the entire length making sure to apply pressure so the twine would stay stuck in place.  Then I took a pair of scissors and clipped the bottom loops and attached the fringe to the boot.

3d paper cowboy boot with a pink and blue twine fringe around the bottom half of boot

The paper is Carta Bella - Giddy Up Girl - it matches the Cotton Candy Trendy Twine perfectly.

3d paper cowboy boot with a pink and blue twine fringe around the bottom half of boot

Besides the wide array of colors I love the quality of  Trendy Twine.  
It stays twisted even after you cut it.

Products from Annie's Paper Boutique:

If you are new to Trendy Twine, you will want to check out these fun places:
Shop for Trendy Twine HERE
Follow Trendy Twine on Facebook

Thanks for Stopping by.

Do what inspires you,
Cyndy G.

Friday, July 21, 2017

Planner Friday - July

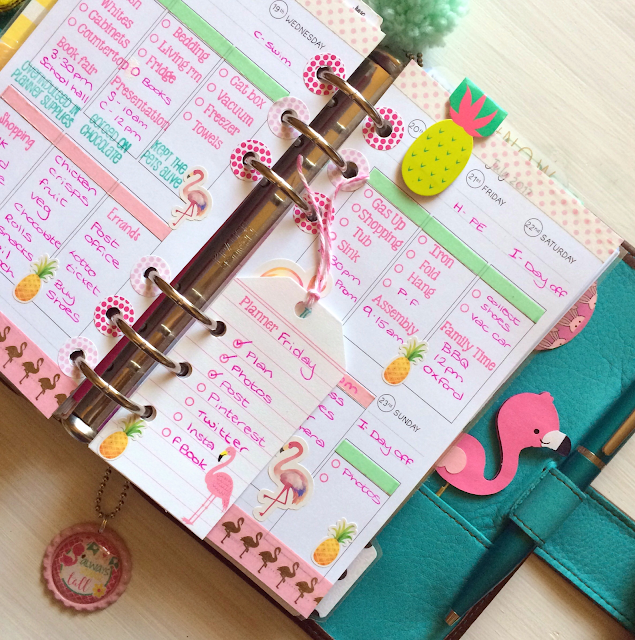
Hello!  Welcome to Planner Friday!  I know for some of you the summer holidays began a while ago but here in the UK the schools don't finish until this afternoon and I really can't wait!  I wanted to do a tropical theme in my planner to celebrate the start of lazy days and endless sunshine (fingers crossed!) so let me show you what I used and how it turned out.


Products used:

Used but not pictured:

As always I started out with some washi tape and Trendy page dots to give my pages a splash of colour and then got out my collection of planner stamps to fill in my to do lists and reminders.  


My Planner Friday to do list

I also made myself a little Planner Friday card to keep track of what I needed to do for today's post and added a bit of Trendy bakers twine just because it's such a pretty colour!


My week so far

I am documenting my week using one of the newer stamp sets from Annie's Paper Boutique, they are so funny and give me a giggle when I am selecting which one sums up My day.  Some of my favourites from this set are "Didn't slap anyone", "Kept the kids alive" and "Overindulged in planner supplies" which is particularly apt for me!  I am using a different colour ink for these stamps so it is easy to see straight away what kind of week I have been having and I love the combination of pinks and greens together.

If you are feeling the urge to overindulge in planner supplies too then stop by the store now and see what takes your fancy!  Go on, treat yourself!

See you again next month!

Amanda

Saturday, March 18, 2017

Trendy Twine -Rainbow

Hello all! Tanya from Crafting on Caffeine here today as Guest Designer.   I'm so so excited to share this with you! As you can see I used LOTS of beautiful Trendy Twine.


Here is a list with direct link for each Trendy Twine I used:


I just love how the colors pop! 


For all the rest of the details please stop by my blog, Thank you!

Saturday, October 31, 2015

Trendy Twine - Happy Halloween

Happy Halloween!

Our wonderful and very talented designers created 
some festive projects to make your Halloween a bit happier.


I know you've got to be smiling now from all of the cuteness!

Be sure to drop by each blog for all the details and 
leave some bloggy love while you are there.

Visit us:
Trendy Twine Blog ~ HERE
Trendy Twine Facebook page ~ HERE
Twine It Up! Facebook Group ~ HERE
Trendy Twine Store ~ HERE

Have a fabulous day!


Sunday, February 8, 2015

We Go Together Like...

Hello all you Trendy Twiners, It's Kendra from Inkin It Up with Kendra! and it's my last day as a Guest Designer for Trendy Twine - I've had a lot of fun!  I created my most favorite valentine yet using this supah cute stampset from Lil' Inker Designs.
 
 
I chose the Grape Fizz Twine for this project and I think it looks fantastic!!  I'm loving the color scheme too!

 
I used Ranger Glossy Accents on the peanut butter and jelly to give them a little shine - they look adorable!!  I'm a Glossy Accents addict! (and Wink of Stella too lol)

 
Thank you so much Lesley for having me the last few days and thanks to everyone for checking out my designs....I hope you have enjoyed my time here, I know I have!  If you want to know more details about my card stop on by my Blog Inkin' It Up with Kendra!  Have a wonderful Sunday!!!


Saturday, February 7, 2015

Love You More ~ Guest Designer ~ Kendra

Good Morning Trendy Twine Fans, It's Kendra from Inkin' It Up with Kendra, I'm back as a Guest Designer and have another super cute Valentine's card to share with you. 

Oh how I love making cards for Valentine's Day - the chance to tell/show someone just how much you love them by giving something handmade is one of my favorite things to do!  Especially for my girls and my hubby! :)


I put together this fun and colorful card using the Pinkberry Sorbet Trendy Twine to "tie" it all together.  I'm loving this sentiment from MFT Stamps - I decided to die cut the heart and put it inside the sun...I think it just pops!


 I hope you enjoyed this little peek of my Valentine design.  For more info on my project come on over to my blog, Inkin' It Up with Kendra

Thanks so much for stopping by, have a fabulous Saturday and come back tomorrow for another project I'll be sharing with you!  :)


Friday, February 6, 2015

Hello and A Valentine Shaker Card ~ Guest Designer ~ Kendra

Good Morning Trendy Twine Lovers, it's Kendra Hernandez from Inkin' It Up With Kendra!  I'm your Guest Designer for Trendy Twine for the next couple of days!  When Lesley approached me several months back and asked if I would be interested in Guest Designing, I told her I would be honored to hang out with you lovely ladies for a few days and share a few of my creations using that YUMMY baker's twine!

I love designing for Valentine's Day and I love this color combination even more (it's one of my favorites)  I designed this card using the MFT I Love You More and Mama Elephant Carnival Cupcakes Stampsets.  For the Shaker Heart I used the MFT Pierced Heart Stax, Sequins and some 3M foam double sided tape.    I polished off the card with Trendy Twine's Totally Red and Pinkberry Sorbet ....love this stuff! 


Here's a couple of close up pictures so you can see the design and of course that yummy twine a little better!


I love layers and 3 dimension - it's my style!  :)


I hope you enjoyed my design and my use of the baker's twine - Trendy Twine has a great product and so many different styles to choose from!  I'll be back tomorrow with another valentine peek!  Come and say hello over at my blog Inkin' It Up with Kendra! or over on my Instagram: khernandez331 - Have an amazing day!  :)


Friday, November 7, 2014

Flower Gift Box By: Trendy Twine Guest Designer Fleurette Bloom

Hi all, Fleurette here. When I was asked to Guest Design for Trendy Twine I was so honored, as it is my absolute  favorite go to for that extra special finishing touch on projects.  Also the quality of the product and people are top notch!!!

Today I am sharing with you a pretty fall themed gift box that I embellished with Orange Truffle  and Totally Sky Trendy Twine giving the appearance that it is all wrapped up.  The fun part is you can open it without removing the twine! It will always look like a pretty wrapped up package / decoration.  I think this will make an extra special gift!


To create this special gift box, I used the following Fleurette Bloom  3D SVG files and Paper Collection:

The Trendy Twine I embellished with is: 
* To attach the twine so that the box can be open and closed without removing it:
     1. Cut strands of twine long enough to reach around two sides and top of box.
     2. Drape strands over top and sides of box forming and X.
     3. Glue twine strands with hot glue to the top / center of the box (let strands drape down the                    sides.
     4. Glue bottom ends of twine to bottom edge of box, then cut so they are even with the bottom of            the box. 
     5. Glue on your leaves and flower to top of box. 
#svgcutfiles #trendytwine #svgcuttingfiles #svgcutfilegiftbox #giftboxsvg #flowersvgcutfiles
Thanks for popping in to see my project!

Happy Crafting, 


Friday, July 25, 2014

Gift Tags...

Happy Friday Morning!!! 

It's Candi again from FILO*eye*candi to share with you all another project
showcasing two Trendy Twine Minis!

Here are a couple of gift tags that I created...
Above I used the following items...
Black Chevron Trendy Page Dots


Above I used the following items...

To create these tags you will need the following items...
-any color/size shipping tags
-black ink pad
-"To" +  "From" stamp or you can just use your own handwriting
-adhesive
-any color Trendy Twine
-fun stickers
-matching Trendy Page Dots
-kraft bags
-colored tissue paper

How to place the twine around shipping tag...
I used my roller adhesive and rolled over the bottom/back several times.  I placed the start of my twine on the bag against the adhesive and wrapped the twine around 5-7 times until the way I liked it.  Cut the twine off at the back side and stick it down against the adhesive.  Stamp or write your "To" and "From"...add some cute stickers and then place a Trendy Page Dot around the hole of the shipping tag.  Take your scissors and cut a slit at the center/top of tag so it can go around the handle of your kraft bag!  

I want to thank Lesley for having me as a guest designer this month.
It was so much fun creating with a great product.

Thanks for stopping by and have a great weekend :)
Candi

Friday, July 18, 2014

You brought COLOR into my life.

 Good Morning!!!

This is Candi from FILO*eye*candi and I am super excited to
be here as the guest designer this month! 

There are sooooooo many amazing colors to choose from...it's hard to just pick a few to
create with so I decided on 5 beautiful colors!


Supplies used for the card I created...
 For this greeting card I used white cardstock, scrapbook paper, circle punch,
mini stapler, inks, popsicle sticks, adhesive, pop dots and of course......Trendy Twine!


 I basically trimmed down my patterned paper to size, crumpled it up,
then spread it out onto my white card base and stapled
it down on all four corners.

Next up I took each ink color and "smeared" it against all four edges of the card...

Now it's time to grab those popsicle sticks and twine......
I started off using a glue dot to hold my twine in place at the beginning (back side
of the popsicle stick)...then I continued to wind the twine around the
popsicle stick...towards the end I cut the twine and used another glue dot to hold
that end in place.


Time to assemble the card...
I used liquid adhesive and spread it out in the middle of the card and
started to lay out my popsicle sticks, pressing them down firmly.
Then I topped it off with a circle layer and then my saying using pop dots
for a little added dimension to the card!

I had so much fun creating with this gorgeous twine!
Looking forward to sharing another project with you all next week :)

Thanks for stopping by...
Candi