Showing posts with label Christmas Card. Show all posts

Thursday, December 8, 2022

Trendy Bakers Twine~The Most Wonderful Time

Hello all!  It's the most wonderful time of the year...Christmastime!  Beth from Beth's Beauties here today, and I am sharing the retro card that I recently created. It is sure to put a smile on your face!
I used patterned papers from The Paper Studio's Woodland Wonderland 6x6 pad and added a delightful focal point of a Christmas Scooter Retro Tag.  Doesn't that image just make you want to go on a Christmas tree hunt?  You could also substitute the tag with a stamped or die cut image to change it up.  The sentiment from Let It Snow Christmas stamp set was stamped in black.  Krafty Red Trendy Twine accented both the sentiment and around the scooter tag.  Delightful Sequins were the perfect final embellishment.  Adhesives used include Bearly Art precision tip glue and foam tape.

Here's what I used from Annie's Paper Boutique:

Here is a look at the featured samplers of the month:


Don't forget all Christmas stamps are on sale this month!

I hope you have a wonderfully crafty day! 

If you are new to Trendy Twine, you will want to check out these fun places:
Shop for Trendy Twine HERE
Trendy Twine on Facebook
Trendy Twine on Instagram

Tuesday, December 22, 2020

Trendy Bakers Twine -- Wrapped in Love

 Hello! I'm Helen from HTB Creations. Today I have a Christmas card to share with you using Peppermint Icicle Trendy Twine and Peppermint Icicle Sequins.  


I used this die cut layer and love that it sort of looks like a snow globe the way everything fits! The Peppermint Icicle Trendy Twine is glued around the border and I added a bow. The snowman is attached with foam tape and I added a few Peppermint Icicle Sequins to tie it all together.

Be sure to check back for more fun projects!

If you are new to Trendy Twine, you will want to check out these fun places:
Shop for Trendy Twine HERE
Follow Trendy Twine on Facebook
Twine It Up! Facebook Group


Have a great day!


Wednesday, December 16, 2020

Quick and Simple, Last-Minute Merry Christmas Card

   Hello, crafty friends! 

Guest Designer, Lisa here from LisaMensing.com. 

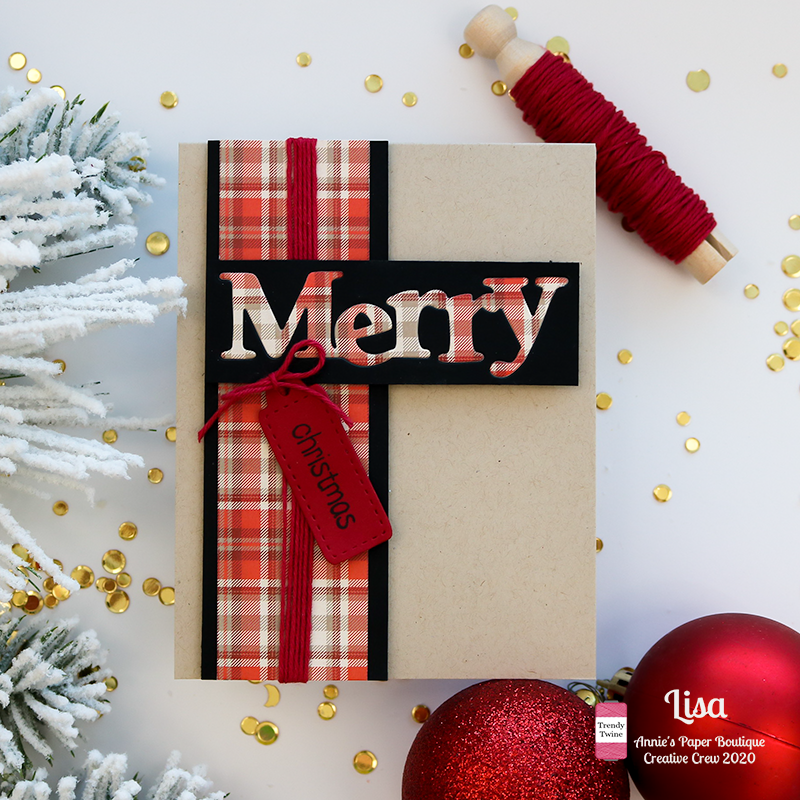
Today I'm sharing a quick and simple, last-minute Christmas card featuring the gorgeous Totally Red Trendy Twine from the Frosted Cranberry Sampler Pack.


Right now, I need all the things to be quick and simple because they are all last-minute! And this card checked off all those boxes for me plus it reminds me of tidy a little package. 


To create it I die-cut the word Merry from pattern paper and black cardstock, inlaying the pattern paper in the black cardstock. Trimmed a two-inch strip of the same pattern paper and a two and half-inch piece of the black cardstock with a paper trimmer. I centered the two-inch pattern paper on the black cardstock, adhered it with glue, added two strips of mounting foam to the back of the black cardstock leaving a gap between the two so I could wrap the Totally Red Twine around the cardstock, and tied a knot, to secure it in place. I die-cut a tag, stamped Christmas on the tag with Versafine Onyx Black ink, then tied a neat little bow to hold the tag on. Using mounting foam I adhered the inlaid die-cut word across the card. This is an A2 Kraft card base. 


Thanks for stopping by. 

If you are new to Trendy Twine, you will want to check out these fun places:
Shop for Trendy Twine
Follow Trendy Twine on Facebook
Follow Trendy Twine on Instagram


Wednesday, December 12, 2018

Trendy Bakers Twine Guest Designer: Merry Mail

Ho ho ho. 
It's Angeline from ScrappyScrappy and I am back again with another holiday Christmas card for you.

Today, the feature is this beautiful mixed colored twine: 

Trendy Twine: Guest Designer - Merry Mail #trendytwine #scrappyscrappy #merrymail #twine #christmascard #card #cardmaking #coloredpencils #unitystamp #sequins #nuvoglitterdrop #simonsaysstamp #stamptember2018 #mamaelephant #santa #cloudstencil

For my card I am using the Simon Says Stamp Stamptember 2018 Mama Elephant set "Merry Mail".  I first inked up the skies with a cloud stencil with Tim Holtz distress oxide inks. I stamped and colored all the fun little bits with my colored pencils.

Since Santa is already in his cute little plane writing the word "Merry" in the sky, I thought it would be fun to do decorate the word with twine.  I used Thermoweb's mixed media adhesive (which dries clear) and traced along the lines of the word, then slowly twisting the twine and pressing it down along the way.

Finally, I added some pretty Unity Stamp sequins and nuvo glitter drops.

Trendy Twine: Guest Designer - Merry Mail #trendytwine #scrappyscrappy #merrymail #twine #christmascard #card #cardmaking #coloredpencils #unitystamp #sequins #nuvoglitterdrop #simonsaysstamp #stamptember2018 #mamaelephant #santa #cloudstencil

Here is the beautiful twine I used for today's card:


Click here to Shop
Click here to follow us on Facebook
Click here to join our Twine It Up! Facebook group

Wednesday, December 5, 2018

Trendy Bakers Twine Guest Designer: Angeline Choo

Happy December.
It's Angeline here from ScrappyScrappy and I am BACK!
It has been a while since I was here but hey, you'll see me for the whole month of December.

Since it is the holiday season, I have a fun Christmas card for you.
The feature for today is: Trendy Twine’s Christmas  Mint Little Bits.
I love the little bits because you get a little of every beautiful twine.

Trendy Twine: Gingerbread Christmas Mint Little Bits #trendytwine #scrappyscrappy #christmascard #christmas #gingerbread #gingerbreadhouse #copicmarkers #cardmaking #twine #merrychristmas

For my card, I used Pink and Main's Gingerbread stamp set, colored them with Copic markers. Then I added Nuvo Glimmer Paste [moonstone] for the glittery snow.  I also used some foiled patterned paper to add to the glitz.

Then for the twine, I tied them into little cute bows first before adhering them onto my candies with some Thermoweb mixed media adhesive. It clears dry, so no worries of any adhesive peeking through :)

Trendy Twine: Gingerbread Christmas Mint Little Bits #trendytwine #scrappyscrappy #christmascard #christmas #gingerbread #gingerbreadhouse #copicmarkers #cardmaking #twine #merrychristmas

Here is the beautiful twine that I used for my card today:


Click here to Shop
Click here to follow us on Facebook
Click here to join our Twine It Up! Facebook group

Friday, December 15, 2017

Trendy Twine - Guest Designer, Christi Steinbeck

Ten more days till Christmas!  (But, who is counting, right?)  Christi here from Scrapping For Tranquility with my last Guest Designer post for December.  I always love when Lesley and the gang here at Trendy Twine grace me with this honor!  Who can't resist Trendy Twine's Bakers Twine????  I know it is on the top of my Christmas list!

For my last project I want to share with you another Christmas card I made for a special friend.


I found something similar in a magazine, like my last post, but of course had to make this mine.

I started off with a white base folding it in half and putting a red Piece of AC Card stock on top of this.  I then pulled out my DCWV stack, Winter Solstice for the pattern snow flakes.  I Glued all three down together .  

I brought out my Nested, Stitched Circles from Pink and Main and laid them in the middle of the front of the card.  (making sure to not have the back of my card in the way.)  And ran it through my Big Shot to cut out the 3 inch circle.

Taking a 3 inch die and a 4 inch die I then cut out the frame to go around the circle, and set it aside for later.

Cutting 5 , 3 1/2 inch pieces of Frosted Cranberry Trendy Twine, I proceeded to lay ATG Tape around the circle edge then stretching the twine from one side to the other.  Keeping the twine at the top of the circle close together and spread out at the bottom.
When the Twine was laid out I put the ATG tape over the top of the twine edges around the circle edges again to now lay the frame I cut out earlier.  I proceeded to put Glitter Glue around the frame and set aside to dry.
I cut out a 1 1/2 in circle and a shadow for my sentiment and picked out a sentiment from a stamp set I had in my stash.  Once my glitter glue was dry I glued my sentiment on at the bottom of my circle and made a bow out of my Frosted Cranberry Trendy Twine and draped it down the sides of my circle.  To finish it off, I added clear snowflakes and added red and blue bling to the centers to match my twine.

Here is what I used from Trendy Twine:


I hope you all have a VERY Merry Christmas and a VERY Happy New Year!

Blessings,


Friday, December 8, 2017

Trendy Twine - Guest Designer Christi

Hello!  It's beginning to feel a lot like Christmas!  :)  Christi here, and I am sooo lucky to be a Guest Designer again this holiday season for Trendy Twine!  YEAH! 

I want a share a card I made but I can't take full credit for it.  I found one similar in a crafting magazine and loved it.   I filed it up in my to do list and finally had a chance to make it.  Now I am sharing it with all you Trendy Twine fans!  

With out further ado:

Easy to make, You take and cut out a triangle (taller than wide) out of card stock.  Wrap it in double sided  tape.  I used Christmas Mint Trendy Twine to wrap closely together around the triangles to make the trees.  Decorate with Bling.  Tear Card stock for the mountains and I used Stickles for the snow tops.  You can make your card front any way you would like.  I then decorated with shaped buttons and bling.

Here is the what I used from Trendy Twine:


I hope you enjoyed my Christmas trees made from the Christmas Mint Trendy Twine.  Leave me a comment and let me know what you think!