Showing posts with label Candy Cane Sequins Mix. Show all posts

Thursday, December 21, 2017

Trendy Twine -- Merry & Bright

Hello everyone!  I'm Helen from HTB Creations. Can you believe that Christmas is in four days?  I'm not ready LOL!

Today I made a quick Christmas Card.  I used Berry Trendy Twine, the Merry & Bright stamp set and some Candy Cane sequins.


This card went together pretty quickly.  I die cut the oval and the image is a print then cut from my Cricut.  I glued my Berry Trendy Twine around the oval and tied a pretty bow for the top. 


Then I stamped the sentiment from the Merry & Bright Stamp Set at the top in red, pop dotted my penguin on the card and added some Candy Cane sequins.

I hope you have a fabulous day!  Be sure to keep checking back for more great projects :)

Shop for Trendy Twine HERE
Follow Trendy Twine on Facebook


Wednesday, October 19, 2016

APB Release Day 3 - Hello Santa Stamp Set

Good day to all my bloggy friends!
Happy Wednesday!
It's Millie from Crafting with Creative M!
Today is Day 3 of the new stamp and product release from Annie's Paper Boutique.
So for my project I will introduce to you the New Hello Santa Stamp Set along with the Chipboard Tag Mini Album. Super Excited!!

For my Chipboard Mini Album, I used the "Evergreen Stack" from DCWV.

For the cover, I made a shaker frame using the Candy Cane Sequins from APB.
 I adhered a Santa die cut to the center and placed a Christmas holly berry sticker onto the corner of the frame. I stamped the "Santa Claus is coming to town" sentiment on a die cut banner. I adhered a Red & White Polka Dot Trendy Page Dots to the center of the pretty red bow.

 (Back)
I made a belly band for the adorable tag.
I used the print and cut feature on the Cricut Design Space on the images. The Images are from Miss Kate Cuttables. I used the Green Polka Dot Trendy Page Dots on the top of each tag with the Totally Red Trendy Twine.

(2nd Tag)
I made a Santa belt out of ribbon and glitter cardstock. I added some glossy accents to the belt (black) and stamped the "Hello Santa" sentiment on a stitched square die cut.

(Back)
I made a green belly band for the super cute Santa tag and used a scallop & stitched circle die.

(3rd Tag)
I used the same Santa die cut and stamped the Ho, Ho, Ho, sentiment on a die cut label.

(Back)
I made a pretty red belly band for my elf tag.For the tag, I used the Spellbinders Nestabilities Big Scalloped Squares.


(4th Tag)
I adhered a holly berry sticker to the stocking image and stamped " From Santa" on a die cut banner.


(Back)
I fussy cut both corners with the left over scraps from the Evergreen Stack so that I can place my Gingerbread tag.

(5th Tag)
I fussy cut the stocking from the Evergreen Stack and used foam tape for dimension.
I used Totally Red Trendy Twine to hang up the adorable stockings. I stamped the "Hello Santa" sentiment individually to fit the tiny tags. I added a fun border to the bottom.

(Back)
The red reinforcements are from the Cricut Design Space,
I used Bazzill Basics dotted swiss card stock for some texture.

(6th Tag)
I fussy cut the Santa image, stamped "It's Santa! I know him! on a piece of white scrap and used a decorative scissor.

(Back) 
I absolutely love the candy cane paper from the Evergreen Stack. 
For my tag, I used a scallop & stitched circle die and a candy cane felt sticker.

(7th Tag)
I used the Santa die cut tag from the Cricut Design Space and stamped the "Hello, Santa" sentiment. I added a fun border and trim to the bottom of the tag.


(Back) 
For my tag, I used scallop & stitched circle die and a present felt sticker.

(8th Tag)
I fussy cut the gingerbread images (duplicates) and used foam tape to adhere them together. I stamped the "Cookies for Santa" sentiments on a Spellbinders Nestabilities Labels Ten.


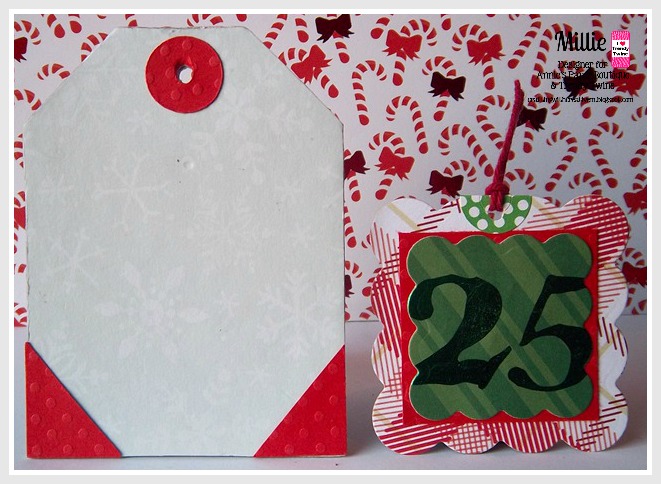
(Back & Last)
I used a square die to cut out the number "25" that is included in the stack as well.

Here is a look at the Totally Red Trendy Twine Pom Pom!!

All of the new products will be released and available on Friday, October 21st over at Annie's Paper Boutique. Don't forget to stop by the Trendy Twine blog this entire week
to see all of the wonderful projects created by the amazing DT.

Click here to Shop.
Click here to like us on Facebook.
Click here to join our Twine It Up Facebook group.
Click here to follow Trendy Twine on Instagram.

Thank you for stopping by and have a wonderful day.

Thursday, July 21, 2016

Trendy Twine - Summer Fun!

Good day to all my bloggy friends!
It's Millie from Crafting with Creative M with a Summer Fun Shaker card!

For my card, I used the SVG Cutting Files Wavy Card Base.
I used Recollections basic card stock & Bazzill Basics Dotted Swiss card stock.
The super fun die cuts (sun & life saver) are from SVG Attic's Just Beachy and the anchor is from SVG Attic's Cape CodThe "Summer Fun!" caption is from the Cricut D.S. 
For some extra fun, I sprinkled a few Candy Cane Sequins around my card. 


I wrapped the Stars & Stripes Trendy Twine around the life saver.
For my shaker, I used the life saver file and Candy Cane Sequins with clear beads.

Next, I placed a red sequins and tiny pearl to the center of the Stars and Stripes bow which I then adhered to the die cut anchor. 


Click here to Shop.
Click here to like us on Facebook.
Click here to join our Twine It Up Facebook group.

For full details on my shaker card, please stop by my blog.
Thank you for stopping by and have a blessed day.

Thursday, February 11, 2016

Trendy Twine - Because...

Good day to all my bloggy friends!
It's Millie, from Crafting with Creative M and today's project will feature the pretty Krafty Red Trendy Twine along with the Kraft Tags With Metal Rim.

Here is what I created.....
I made a Valentine's Day Gift Box!

I used Valentine's Day card stock by Recollections to cover my 3x3 Kraft Box.
I used Tim Holtz vintage photo distress ink around the edges.
I wrapped some of the Krafty Red Trendy Twine around the top & bottom parts of the Kraft box. For the heart window shaker, I used the SU' Sweetheart punch.
I used a clear acetate pocket sleeve and filled it with white beads and the red & white sequins from the Candy Cane Sequins Mix, which I absolutely love.
 I adhered the pocket sleeve to the inside of the Kraft box with my ATG.
I then stamped "Be My Valentine" on a banner.
I adhered a scallop circle die cut on the center of the Kraft Tag with Metal Rim, doodled with a white gel pen, stamped "Because I love you" from Tiny Tags, added a brad and a white sticker heart. Isn't it just Pretty? 

For the sides of the Kraft box I used the Scallop & Stitched Circle Die from My Creative Time and the Happy Valentine's Day Printable
For the borders, I used a scallop border punch.

For the top portion of the Kraft box I made a super cute topper with a scallop circle die cut and the Bunch of Fun Circle Dies from My Creative Time.  
I doodled with a white gel pen and added pearl dew drops from The Robin's Nest.

I wanted the tag to dangle a bit so I ran a piece of Krafty Red Twine through the Kraft tag and then adhered it to the center of the Kraft box. Then, I covered it with the super cute topper I made.

Here is a closer look at the Krafty Red Twine which I used around the shaker heart.
Pretty, right?

Click here to Shop.
Click here to like us on Facebook.
Click here to join our Twine It Up Facebook group.

Thank you for stopping by and have a blessed day!

Saturday, December 5, 2015

Trendy Twine - A Christmas Gift!

Good day to all my bloggy friends!

It's Millie, from Crafting with Creative M, and it's my day to post!
I am showcasing the Candy Cane Trendy Twine, Candy Tin along with the Candy Cane Sequins Mix!

Here is what I created.....
A Christmas Gift for a friend!!

I used the pretty "Evergreen Stack" from DCWV to decorate the Candy Tin and the Tags/Ornaments.


I used 3-d pop dots for dimension on the Merry Christmas caption.
On the white cardstock I used crystal snow glitter and adhesive for a snowy texture.
I used the left over scraps for my trees.
I made a double bow with red ribbon & the Candy Cane Twine.
I then sprinkled a few of the Candy Cane Sequins Mix around the Candy Tin.


I wrapped Candy Cane Trendy Twine around the Candy Tin.
Very Festive!!!!


The inside of the candy tin will contain the pretty Tags/Ornaments!!
I used a Christmas Tree Shaker card file to make the tags/ornaments and filled them up with the pretty Candy Cane Sequins Mix. I wrote Merry Christmas on each banner.
I adhered gold stars to the trees and a piece of Candy Cane Twine to hang the pretty tags/ornaments.
 

Here is a look at the fun & festive products I used to complete my project:

Candy Cane Trendy Twine


Click here to Shop.
Click here to like us on Facebook.
Click here to join our Twine It Up Facebook group.
For more details on my project, please stop by my blog.
Thank you for stopping by and have a blessed day!

Friday, November 27, 2015

Trendy Twine - Candy Cane Sequins Mix!!

Good day to all my bloggy friends!
It's Millie, from Crafting with Creative Mand for today I have a special post for you all! I am showcasing the very festive Candy Cane Sequins Mix along with the Candy Cane Trendy Twine. Yiippeee!! 

Here is what I created........Mitten Shaker Cards!!!!!

For my red mitten shaker card, I used the mistletoe crinkle ribbon and the Candy Cane Trendy Twine for my bow. I stamped "Happy Holidays!" on my handmade tag. I added pretty white pearls and for the shaker portion I used the festive Candy Cane Sequins Mix!

For my green mitten card, I made a gorgeous bow with the holly berry crinkle ribbon and the Candy Cane Trendy Twine.
I just love how pretty the Candy Cane Sequins Mix look!

Here is a closer look at the very festive Candy Cane Sequins Mix!

Here is a look at the fun & festive products I used to complete my project:


Click here to Shop.
Click here to like us on Facebook.
Click here to join our Twine It Up Facebook group.

For more details on my project, please stop by my blog.
Thank you for stopping by and have a blessed day!